Showing posts with label bbloggers. Show all posts

Sunday, 22 May 2016

Get it in the bin | Make Up Shelf Life


Now we're all guilty of this, I know we are! I myself have been known to hoard and covet some products WAY beyond the point of acceptance, but for the good of our skin we need to shape up and brush up on the shelf life of our make up. Since posting this on my make up artistry Facebook page I've been pretty inundated with messages of but what will happen if I don't throw away my foundation, but what if this and what if that. Well to put it quite bluntly, acne, blindness, DEATH!!! Okay I'm exaggerating, but the effects of out of date products on your skin ain't good. I mean would you eat a yoghurt covered in mould? Or drink from a separated carton of milk? Nope so why put something like that on your face? Do yourself a favour, make it this months resolution to replace or get rid of any out of date beauty products that you and I both know are lurking in the back of your beauty cabinet and start this summer a new.

Are you guilty? Do the expiry dates on some of your favourites shock you? Let me know in the comments below, come and share your outrage with me on Twitter or as per you can keep up with me and my world shattering news on Instagram, Facebook and Bloglovin.

This has been your weekly PSA by Granite City Girl, stay safe and stay sanitary!

H.Elizabeth x

Friday, 16 October 2015

Make up application | You're doing it wrong!


This is something that I have been meaning to post for such a long time now, it's something I myself only learned last August before I was about to get married from my make up artist for the day, and let me tell you this one tiny make up tip and beauty blunder, that I'm guessing more than 90% of the nation get wrong, can revolutionize the way you do your make up on a daily basis. Now let me just start off by saying I realise most of you who read this will roll your eyes and think that is ridiculous I'm not doing it that way nor will I ever, but just trust me on this, try it for a week, a couple of days even and it will save you time, product and ultimately money! Sounds too good to be true right? Well you'll soon see for yourself.

I remember having my make up trial and wondering of all wonders what on Earth is this woman doing to my face? That weekend I had been suffering quite a bad breakout of immense and stress inducing proportions, so much so, that I thought my wedding make up artist wasn't going to touch my face with a barge pole let alone product, and I panicked a little when the first thing she did was come at me with some eyeliner and shadow products. But what about my base, 'bout my base? I said (lyrically) and it was just then that the obvious dawned on me, you're supposed to apply your eye make up first aren't you? Yes siree bob that thur is a hole in one! My make up artist then went on to enlighten me and my maid of honour that by applying your eye make up and brows first you're less likely to smudge your base and muss up your eyeliner. Logic right?!

At first I thought, ugh rubbish that won't make any difference to me, but being a lifestyle blogger and an I'll give anything a go once type of gal I thought I would make the effort and try it her way for one week. And guys, it has changed my life (well my face at least) I used to be plagued by eyeshadow dust, blasted by clumsy finger smudges and don't even get me started on those eyeliner fails, but with this technique this is a thing of the past. Because I haven't had to touch up and re touch up my base I've actually been saving an incredible amount of product as well as time and money (see I told you we'd circle back around to this)

Have I dazzled you? Maybe, maybe not, maybe you're sat at home thinking, as I did, what a load of rubbish I need a base from which to build my facial empire, and so to all of you naysayers I challenge you to one week, that's right just one week of trying things my way and just see how different your make up routine becomes. If you take on my challenge or just want to have a chat about this beauty base technique be sure to leave your comments and experiences below, come share them with me on Twitter or if you'd like to be dazzled some more be sure to follow Granite City Girl on Bloglovin.

Until next time folks, revolutionising my own facial empire.

H.Elizabeth x

Friday, 17 July 2015

Beauty How To | How to (correctly) apply false eyelashes

Lets be honest folks, this post has been a long time coming. It seems these days I can't go anywhere without somebody asking me how to apply falsies from friends and family members to the girl washing my hair at the hairdressers. So I thought given the increase in you folks asking I would do a quickie tutorial to give you a little helping hand and I can almost promise you that by following these simple steps you'll be lash wearing pros!

Often I find people say to me, 'Oh I just CAN'T put on false eyelashes, can you do it for me?' and instead of doing it for them (as this serves to be even more difficult - imagine someone coming towards your eyeball with glue and something furry...) I actually watch them try to apply them to see where they're going wrong, and usually it's nothing to do with the actual application of the lash but the duration of the glue setting time that appears to be the issue. So today I'm going to act as lash guru extraordinaire and talk you through just how to apply false eyelashes without the faff!


Now just before I get in to the nitty gritty here are some relatively common sense tips I have learned (often the hard way) Never put glue directly on to your natural lashes or lid, if you are going to be wearing eye make up that day apply it prior to your lashes and touch up afterwards, for a more natural look I recommend putting a thin layer of black liner along your lash line and finally always make sure the smaller lashes on the line are along your inner corner.  Pick your lashes and you're all set to go.

1. Carefully remove the lashes from the lash tray, most people recommend taking them off directly with tweezers but I pick gently at the corners of the lashes until they wiggle free. (You otherwise risk yanking clumps of the lashes off thus ruining your lashes before application)

2. Shake the small glue you will have been given as it can be quite runny in consistency when you first open it. Apply a relatively thin line of glue to the lash line only, you should have as much for it to be noticeable but not dripping off. Put the lash down on a clean and clear counter space then apply your glue to the other lash. (Giving the glue a chance to dry ever so slightly and become 'tacky')

3. Hold your first glued lash in the middle of the last and place along the centre of your natural lash securing that along your original lash line. Adjust according to your own lash line and press down gently. To adjust it slightly when secure you can push the inner and outer corner - it shouldn't come off but it will make the lashes more comfortable. Repeat the process with your second lash and you're good to go!

Stage 2 is usually where most people go wrong and they often think the sticky mess they've created all over their face and lashes is because they are missing a steady hand but the trick really is getting things right with the glue. These tips should work on all types of lashes you buy in store but just for disclaimer purposes I am using Eyelure Limited Edition Enchanted in the style 'Poise' at the moment, I use these on a near daily basis and if taken care of properly these will last me for about a month.

Okay guys I really hope you have found this 'how to' guide helpful in some way, shape or form and of course I would love to see your eyelash efforts so be sure to share your thoughts, tricks and tips in the comments below, come share your experiences with me on Twitter or of course if you'd like to see more from me you can follow Granite City Girl on Bloglovin.

Until next time folks, batting my perfectly applied lashes.

H.Elizabeth

Friday, 6 February 2015

Blogging | Buying Your Own Domain

Today I'm going to be doing my first in a segment of tips, tricks and things I have learned during this last year as a blogger. Now before I get into my first 'Blog Tips' post I in no way am an expert and I'm not claiming this is the fountain of youth or holy grail equivalent to blogging nuggets, but this is just my opinions and little things that I have found to work for me, and I'm going to start of with buying your own blogging domain.


As you guys may have noticed recently I have purchased and upgraded to my own domain, www.granitecitygirlblog.co.uk as opposed of course to www.granitecitygirlblog.blogspot.co.uk for me it was a decision a good few months in the making. In fact last year I made a deal with myself that if I kept up my writing and still found myself as passionate about blogging in a years time then I would buy my own domain and work from there, which as you can all see I have.

Before buying my domain I decided it would be best to find out a few of the ins and outs, perks and pitfalls if you will, that come hand in hand with buying your own domain, which is something I am hoping this post can help all of you with any questions or queries you might have revolving around domain purchase. I have to be honest in that my main reason for purchasing my domain name was really to drop 'blogspot' from my URL, that can pretty much sum up how little I understood or knew about the benefits that come with owning your personal domain name, but upon a little research (admittedly after I bought the name) I found domain purchases can bring a whole host of benefits to you the blogger.

Blog Ownership
Owning your domain takes the who out of the question of ownership. Funnily enough on researching domains a bit further you'll find that this content you may have worked very hard for, perhaps for years can all disappear at the click of a report button never to be seen again. With your own domain you are in control and have ownership of the platform in addition to the content (but I still suggest you back up your work somewhere more concrete you know... in case of apocalypse)

Increased Traffic
Since buying my own domain name I have noticed an increase in traffic being referred to blog, and as much as I would of course like to believe it is due to a step up in content we can actually trace this back to my new domain. When your address contains blogspot.com Google and other search engines will tend to index these whereas when people search for your unique domain address you will usually come out on top of the search engines.

Credibility
At risk of sounding incredibly vague, it just sounds and looks much better to drop your host. By creating your domain name you are creating your blogging brand and at the end of the day who do you want to be promoting? Blogspot? Or you? Brands will want to work with you a little bit more and you'll get that little sense of pride from typing your new domain name that is genuinely just yours.

One thing I will say however is that setting up your domain name is relatively easy, I personally purchased mine through GoDaddy who, to give them credit, did try to set up my domain but I think a few wires were crossed and all the did was make the domain a forwarding to my blog - which of course is not what I wanted. But by reading the instructions on Bloggers and GoDaddy's websites carefully enough I was able to set it up myself (and if I can do it, believe me you can too!)

Hopefully some of you have found this interesting, helpful or somewhere in between, I really just want to share a few things I have learned and found as a blogger this last year and I hope to share more knowledge I may accumulate in the months going forward. If you have any questions on how I set up my domain, what I have found the differences to be or if you just want to ask me a question in general be sure to leave a comment below, come share it with me on Twitter or if you just want to keep up with my latests posts be sure to follow me on Bloglovin.

Until next time folks, I'm off getting tecchy.
H.Elizabeth xx

Wednesday, 26 November 2014

Granite City Girl's Week Without Heat


For those of you who follow me on Twitter you will know that just last week I embarked on a journey back to health... back to healthy hair at least and I decided to go an entire work week without applying any heat styling or drying etc to my hair whatsoever. So I thought today I would share with you just how I got on, how I styled my hair and the overall results.

Just for a reference my hair without any blow drying, straightening or curling irons looks a bit like this, so I don't suffer from any MAJOR frizz or slicky greasy problems some people do when they go without heat can, in that sense I have been quite lucky, but it was still no picnic!

Just so I can clearly lay the parameters, I wash my hair every evening and I use a hair masque twice a week. I lightly towel dry my hair afterwards, brush it through and leave it to dry itself.

Hair Au Naturale


Day One

This was the day my hair was in the worst condition and it was definitely the day it took the most getting used to. My split ends were out in full force, but on the brighter side I was surprised to learn the style itself was actually not too bad, so all I had to do was give it a wee brush and off I went (although people at work did think I had just rolled out of bed)

Day Two

It seems even though I wasn't using direct heat to my hair you still can't escape some damage, especially with these cold wintery days! So needing a little bit of TLC I broke out my new Tres Emme Keratin hair masque, and indulged by leaving it on my head for about 10 minutes.

Day Three

After my hair care and TLC from the night before this was probably the day I noticed a considerable difference in my hair, it seemed much smoother especially at the ends (which are usually frazzled!)Unfortunately due to the lovely Scottish weather we've been suffering of late I had to just swish my hair into a pony for the day!

Day Four

Another TLC evening for my hair as it was treated to yet another indulgent hair masque, which it thanked me for the next day! Since I had an event on the Friday evening I thought I had better pay extra attention to it this evening and ended up wearing my rollers for a while while it dried minus heat obviously! It still came out voluminous of course but just not as I would have hoped!

Day Five

Using a barreled hair brush I got my desired volume without heat, just with spray! And you'd never have been able to tell I hadn't used any heat on my hair whatsoever if you were judging simply by the style. It's much more work than I am used to but if it's going to improve the health of my hair then I say go for it.

I survived my week without heat, and I do recommend you try it from time to time to give you hair a little break from styling and harsh temperatures otherwise you are at risk of causing some major damage in the long run! When I was younger I'm the first to hold my hands up and say yes I was guilty of OVER straightening my hair and no wonder it took so long to grow out my Snow White bob!

Of course if you must use heat for example if you have a special occassion or just cannot part with your heat styling tools be sure to use a good quality heat defence spray on your hair, below I have listed a couple of my favourites just in case anyone is interested in how I plan on maintaining my silky smooth locks now I have them back!
Heat Styling Product Choices


For day to day - Tres Emme Heat Defence Spray
For evenings out - VO5 Plump it Up Amplifying Blow Dry Lotion (Heat Defence)
For styling - Large barreled hair brush
For long lasting hold - VO5 Ultimate Hold Hairspray

I hope you enjoyed today's post, have you ever gone without something to improve the health of your hair or have you even gone without something to improve your skin and nails? Be sure to share you experiences in the comments below or come tell me about it on Twitter or if you're interested in keeping up with my latests come find me on Bloglovin

Until next time folks.

H.Elizabeth x

Wednesday, 19 November 2014

What I Wore | I Wanna See Your Peacock

If there's one thing my nearest and dearest know about me it's that I rarely have a night on the town. I'm afraid I'm an old soul who would sooner cuddle up with my iPad and a mint tea than live big in the city after dark. But on those rare occasions when I do find myself at a 'perty' I do like to make more of an effort, so I thought I would share with you guys my most recent outfit for hitting the town.

What I wore on my body

I didn't want to go too OTT with my outfit for this particular evening as it was beginning as a games night so I thought something you can dress up or down was most appropriate and I came up with this wee number.

L - Full Length Peacock Dress. R - Close up dress pattern

Peacock Dress - New Look
My friend actually spotted this dress on a weekend away to Edinburgh and promptly put it down, which I was in shock and awe of since I found it so beautiful. Due mainly to the pattern, the shape and suit to my body was a simple bonus. The pattern is a monochrome peacock print with accents of red in the centre, a great pop of colour that would do well with some red flats on a day out or some red heels for an evening (which I don't have!) 

What I wore on my feet

Black Stilettos - H&M
Never underestimate the power of a plain black heel in classing up a casual outfit, since losing my usual, comfy black stilettos due to general wear and tear I have been at a bit of a loss when it comes to my heel collection and funnily enough H&M had the answer. I never expected H&M stilettos to be quite as comfortable as these but they are my new go to shoes for a long evening out. Since I can NEVER find a size 3 shoe in New Look anymore I think I will be visiting them quite a bit more now.

What I wore on my head and face 

This was one of  my more experimental looks of the past few weeks and I have to say I was pretty darn chuffed with how it all turned out (I have since tried to repeat this phenomenon to no avail) I found it was very bouffant 1960's, not quite the trend of the moment but hey sometimes who cares it's all about what works for you!

Hair and make up look
How I wore my hair

Voluminous Curly Wurly Do - Rollers and Heat Tools
So to achieve this look I used my huge velcro rollers and applied them to slightly (VERY slightly or it'll take ages to dry) and left them on my head for about an hour. I then blasted them with really hot air from my hairdrier and then quickly swapped to the cold setting to allow your hair to hold that sort of style. After taking the rollers out I brushed it out and then curled the ends of my hair only and then backcomb backcomb backcomb (SO bad for your hair so I'm not endorsing this for you guys at all) I loved the way my hair came out for the evening as I got a lot of depth and texture to it by styling it this way, and with the right amount of hairspray it really did last (until the long walk home!)


How I made up my face

Eyes - 
L'Oreal Colour Riche Liner in Charcoal
MUA Charcoal, Silver and Shimmer White Eyeshadow Trio
Benefit's They're Real Mascara (top and lower lash)
Katy Perry Lashes by Eyelure (Feline Fierce Lashes)
Brows -

Sleek Brow Kit in Medium
General Face Area -

Arbonne Make up Primer
MAC Studio Sculpt SPF 15 Foundation
Rimmel Natual Bronzer (Contouring)
Collection Lasting Perfection concealer (Highlight)
Blush by George at Asda (A hidden beauty gem)
Lips -
MAC Hip 'N' Happy Lip Pencil
Clinique in Mighty Mimosa


This is obviously not what I would wear on a daily basis I usually don't wear foundation or concealer or anything on my face for a general working day but you know when you've got so much make up and an occassion is coming up you just can't help but play with it sometimes.

Let me know what you guys think of this look I hope it has inspired you to go and have an experiment and play about with your own looks! Or of course if you have any tips, pointers or comments be sure to leave them below, otherwise and as always you can catch me on Twitter or if you'd like to see more of my latests keep up with me on Bloglovin


Until next time folks!


H.Elizabeth x

Sunday, 16 November 2014

Domestic Goddess | Mini Baked Oreo Cheesecakes

Now even though I have been making a solid attempt to eat a little bit better to shed a few lbs. for the festivities, this doesn't mean I'm going to give up some of my sweet stuffs! And I always think making something nasty yourself is better than buying it in, hey at least you know how it's being made and what's going into it!
So today I thought I would share one of my most recent culinary successes, if I do say so myself, in the form of bite size (depending on you gob size) Oreo Cheesecakes.


Now these are not good if you're looking for a quick sweet fix as you will need to refrigerate these over night, but these are perfect for an after dinner treat! 

What you'll need (equipment wise)
2 large bowls
Wooden Spoon
Paper or Silicone Cupcake Cases
Something to weigh out your ingredients (it's surprising how often people forget this)

What you'll need (foodie wise)
400g Philadelphia Light
75g Caster Sugar (I use silver spoon)
2 Medium Eggs
12 Oreo Cookies (keep extra if you like crunch)
110g Milk Chocolate (or any kind of chocolate you like)
A couple of tbsps of Philadelphia Cadburys Chocolate

What you need to do
For the Cheesecakes
  1. Preheat your oven to 180oC and beat the Philadelphia, caster sugar in a bowl until completely blended (Philly goes funny when you mix it, you'll understand when you see it) Add your eggs, one at a time, stirring until fully blended again.
  2. Place one cookie in the bottom of each casing, and if you like a bit of crunch in your cheesecake I suggest crumbling up some of your cookie biscuits into your cheesecake mix. Now fill your cases evenly with batter.
  3. Bake in the oven for 18 - 20 minutes until your centres are almost set. Cool these on your cooker top and then refrigerate for at least 3 hours. I recommend doing these over night though just to be sure. 
  4.  
For the chocolate topped fondant (to be done after refrigeration)
  1.  Using a plastic bowl over a pan of boiling water melt your milk chocolate (or any chocolate     you so choose)
  2. Once your chocolate has fully melted add a dollop of your Cadburys philadelphia, don't panic it will not look like its going well.
  3. Add enough philly and it should roll into a fondant chocolatey ball which you can take off of the heat and leave to cool a little before dolloping on top of your cheesecakes and leaving to set.
And that's all there is to it, they are so delicious, and not good for you but you know you've got to treat yourself sometimes!


If you do or have given this recipe a try before please let me know how it went or if you'd even like to share some similar recipes drop me a comment below, come tell me about them on Twitter or if you'd like to see more beauty and lifestyle posts make sure you keep up with me on Bloglovin.


Happy baking folks!

H.Elizabeth x

Wednesday, 12 November 2014

All Brand New | Eyebrows on Point


Hello everyone, as you may have noticed recently through my intsagram or twitter posts I have had my eyebrows done (waxed and tinted) for the first time in my life and so I thought I would share my experience of this with you and tell you how I style them on a daily basis (such an odd concept!)

On a weekend away in Dundee my friends and I decided to book in a few beauty treatments to pamper ourselves and generally have a relaxing weekend so we went to a central salon I believe it was called 'Glow' and booked in our chosen treatments, mine of course being a wax and tint. I was honestly a bit apprehensive about waxing my eyebrows as I don't have the best track record of liking make up and treatments others have done to my face in the past. But the therapist put me at ease and explained it really is the best and most effective way to get a good shape so on I went!

Since having my hair done I have had to put a bit more brow gel and powder on because my hair is so much darker so I thought I would plan a head, saving money in the long run and just have them tinted. I was a little taken a back when the therapist asked what colour I'd like of course I'd like it to match the hair on my head wasn't that logical? But then I remembered all of the ladies who appear to be sporting sharpie brows and felt slightly silly!

The colour was done within minutes, it smelt lovely not like some of the toxicy smelling dyes you sometimes get in salons and beauty establishments and thank goodness it didn't burn. I was really pleased with the colour and I honestly could have easily stopped there but I put on a brave face and had my face waxed!

The pain wasn't bad at all it was over within minutes (my brows were quite full so for others time and pain may vary) It was of course very red when it was finished but that is to be expected! So it was time for the big reveal! 


Left - Before. Right - After

Tah - Dah and I love them (when I put on the filler myself!)  I have even invested in a more expensive brow kit to maintain their shape and to save me going from fierce to fluffy! It's incredible the way that you never notice how bad something has gotten until you have it fixed, I vow to Cara Delevingne and her perfectly formed brows that I shall never let mine become so unruly and misshapen for as long as I blog!

Have you guys ever undergone professional threading, waxing, tinting and plucking or even dared to brave 'HD' brows? Drop me a comment below, come chat with me on the Twittersphere or as usual if you'd like to see my latests come find me on Bloglovin


Until next time folks.

H.Elizabeth x

Sunday, 9 November 2014

Lush | Enzymion Review

Recently I have been having major skin woes and worries, which of course as you all know only makes break outs and temperamental skin problems worse! I tried a few highly recommended products, one from Arbonne, I used my trusty old Nivea, E45 for dry patches and unfortunately none of them really helped to the extent I have been looking for. All fantastic products, just not for this particular severe case!

So as you of course do, I went to Lush to cheer myself up and I did no end! I originally just went in looking for a skin treat like a Facemask or something (Love Lettuce, which I bought and it too is amazing) but upon explaining the problems I've been having with my skin to the lovely shop assistant, she suggested I try out this Enzymion facial moisturiser (I got a small sample pot at first)

But upon trying the sample pot I loved it so much and even though I did clart it on, that's how I like my moisturiser, and my skin felt amazing. Now I'm not saying it was simply down to the moisturiser, I have developed quite an intense skin care routine involving exfoliating, cleansing, face masks, eye creams and moisturising, but honestly I've never felt anything like it.

Usually when I use a moisturiser and my skin is that dehydrated I feel a sort of burning sensation of the cream reacting with my skin, then I resemble Freddie Kruger on an off day with my inflamed face and dry patches! But this actually felt 'good' the moisturiser is very silky in texture so I feel you do need quite a lot of it for one application, but it dries so quickly and leaves a matte finish so I'm not complaining.


Lush Enymion Moisturiser - RRP £14.50

What's in it?
The main selling point for me was the fresh fruit ingredients, featuring the juice of an entire lemon! In addition to the other mains of fresh papaya, blended in light oils and cocoa butter, the girl in the store said this is the best moisturiser for getting rid of dead skin cells and replenishing the look of tired or damaged skin, and since using this moisturiser I have definitely noticed my skin has brightened up a bit.

Overall verdict
I do still have to be careful with the amount of foundation I put on, especially if it's my MAC studio sculpt due to it being so thick, but at least when I do have a heavy handed evening, now I have a quick ish remedy.

I took about 3 or 4 days to see a visible difference in my skin but now that I'm using it on a daily and nightly basis I find myself not even needing to wear foundation every day (which in the long run is a total money saver)

This is a balanced moisturiser, meaning it can help balance oily skin or moisturise and hydrate dry skin and I'm definitely going to be purchasing this again, and I'm going to continue recommending it to people with skin problems similar to my own!

I hope you've enjoyed reading this review and I'd love to hear your skin or lush loves, have you tried out another of their moisturisers or face masks worth checking out? Drop me a comment below, come share it with me on Twitter or if you'd like to keep up with my reviews, fashion and lifestyle posts be sure to follow me on Bloglovin.

Until next time folks.
H.Elizabeth x

Sunday, 2 November 2014

Going 'Half & Half' with a dash of 'Spice'

My love affair with MAC has hit an all time high. On my walks home I can barely resist going in to marvel at their hundreds of lippys, plethora of polishes and of course the obsession only worsens when a new trend hits the seasonal fan, but that is a discussion for another time.

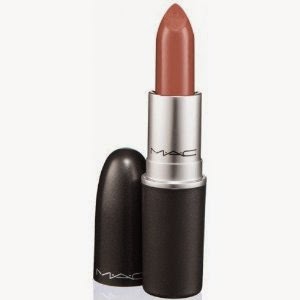
Today I am going to share my brand new vice and must have make up for the month! I know that everyone has been obsessed with MAC's 'Velvet Teddy' lippy made famous by the poster child for lush lips, Kylie Jenner and her mad lining skills! And of course I had to have it! But on thinking of it a little bit further I decided to get a lippy that would best compliment me, my skin tone and general style, because I think that's what this big make up business is all about finding your own style and making up your own face.

And so tah-dah this is what I bought and came up with! The MAC Half 'N' Half Amplified Creme Lipstick and the Spice lip liner.


MAC Amplified Creme Lipstick in Half 'N' Half (RRP. £15.50)


I always love MAC lipsticks for their wearability and pigmentation, and this one in particular is a great moisture rich lipstick that doesn't dry your lips very much at all (something I have mentioned I have struggled with in the past) This lipstick isn't as intense as I would say 'Velvet Teddy' is and I feel it really compliments my skin tone, on others I suppose it's considered a nude but for me it's a gorgeous brown autumnal colour.

The spice lip liner goes really well with this particular lipstick it gives a much darker defined line to your lips so you can build up and build up to give yourself that voluptuous pout we've all been aiming for! The colour isn't technically meant to go with the lipstick but you can do so much with it , you can as I said create a darker and more defined lip and you can even ombre your lips (something I am yet to try as I think I'll need an afternoon for that!)
Tah- dah! The finished product
So what do you guys think? A fair compromise for us Casper folks for 'Velvet Teddy'? What lippys have you been loving lately? Have you tried this trend yet, be sure to drop me a comment below, catch me on Twitter or if you'd like to keep seeing more catch me on Bloglovin!

Until next time folks.

H.Elizabeth x

Wednesday, 29 October 2014

New 'Do | The Saks Experience

Hey guys so I fulfilled yet another Autumnal 'want' this past week and I underwent quite a dramatic (for me anyway) change to my head, which I thought I would share with you guys. As you'll know I've been chopping and changing my hair quite a bit and experimenting with different colours over the past few years (see my 'Hairstory' post if you'd like to follow my 'journey') and this Autumn I was looking for something different and outside the box for my traditional Goldilocks.

While I loved my hair in it's Strawberry Blonde state, with Autumn rolling in and my roots joining, I felt a bit like a hippy wandering around in dull weather with ombre locks and honestly my hair had gotten into such a bad condition through daily heat styling it was time for a chop and a change.

Saks in Union Square Aberdeen
So I paid a visit to my regular hairdresser establishment 'Saks' where I had booked in for a colour, cut and blow dry with a stylist (I reckon she is a senior stylist...she did a pretty ace job at least!) Now I love Saks, it took me a long long time to find a hairdresser I was comfortable with and genuinely enjoyed going to but I can safely say I am content, and to boot it's in my favourite haunt, 'Union Square' If you do ever find yourself in need of a chop and a change and you're about the Granite City I do recommend you give them a go!

Prior to anything touching my head I had my colour consultation and after confusing myself and the stylist, we decided on a warm toned brown with copper tones throughout which wouldn't wash out my skin given I'm such a Casper. And under I went!

The dye only took 20 minutes since my hair was so light, and my concerns about the damage I had already done to my hair was put at ease by the knowledge that the colour they used had conditioning qualities.

Once the colour came off and I was dried to perfection I was so pleased with the transformation, I honestly believe, as I believe with eyebrows, the colour and cut of your hair can do wonders for your face and I personally think darker compliments me far more in the Winter (with the disappearance of my freckles temporarily)

For the entire process I paid £73.00 which I always think is quite reasonable for the service you're receiving, I'm always happy to pay that little extra if the salon and the services they offer are professional, there is nothing worse than feeling like a nuisance when you're paying a bomb. In fact I was so chuffed with my new 'do and the service I have booked in again for a re-colour before Christmas (and I have NEVER had the same thing twice in  a hairdressers ever!)


So there you have it, my Saks Experience and my new 'do, what do you guys think? Share your good and bad salon experiences with me in the comments below, come have a rant with me on Twitter or if you'd like to see more of my beauty blogging and experiences keep up to date with me on Bloglovin

Thank you for the reads, until next time folks.

H.Elizabeth x

Sunday, 26 October 2014

The Girl with the Green (ish) Coat

Can you tell I've been watching 'Confessions of a Shopaholic?' 

As you'll know if you read my October / Autumnal wants post I have recently been on the hunt for a brand new striking, statement winter coat to break my blackish, grey habit and inject some colour into my life. And I'm ever so pleased to tell you I have done it, and at a discounted price too!

When I'm on the hunt for something I generally stick to my comfort zones, visiting shops like New Look and Dorothy Perkins or sometimes I'll dabble in River Island but only when I'm feeling 'out there' but this year I was tempted in and fell for the M & S ad, which has us all in the grips of their fashion forward talons. Can anyone genuinely say that they haven't nailed their AW14 campaign?!

Basically what prompted this was a very Frozen esque jacket I saw on the advert, you all know the one, the ice blue comfy coat with the white trim around the collar! But of course my practical brain set in and when I tried it on, as much as I loved it, it just wasn't practical for Winter. A nice ice blue ensemble is all very well and good but at almost £80 think of the splashes you'll get from cars on the way to work, or think of the clumsiness of yourself in your oversized winter boots and even think of the marks you'll get just from the falling snow! I couldn't risk it!

So instead I tried on and loved this little ensemble which I only saw by chance as it was the last in it's size and on the wrong rack! It's such a lovely fit and the colour is amazing, on the website it's called 'Emerald' which of course being the film buff I am, just whisked me off to OZ. I also love the black (faux) fur trimmed collar. Having no reservations I of course snapped it up ASAP, and I struck even more luck when I found it was 20% of all M&S coats that weekend! So I only had to pay £69.30, luck of the Irish perhaps?


Limited Edition Faux Fur Collared Neck Coat in Emerald (RRP. £79.00 From M&S)

Sorry that I have spent so much time on a post revolving around a new winter coat but honestly it's exciting when you spot a rare find (in this case a smart, on trend, cost effective winter coat that isn't black!) Have you guys found any AW fashion nuggets on you travels lately? I'd love to hear about them, be sure to drop me a comment below, come tweet at me on the Twittersphere or if you'd like to keep up to date with my latest posts be sure to follow me on Bloglovin
Until next time folks
H.Elizabeth x

Sunday, 19 October 2014

Domestic Goddess | My New Recipe Book

Since finishing university (because this has granted me the gift of time!) I have been known to dabble in the culinary delights my kitchen and oven can bring and I'll be honest it's been pretty fun and successful. (Successful here meaning that I have not had nor have I given anybody food poisoning yet)

My most recent culinary creations were mini oreo cheesecakes and before that I tried my hand at chocolate swirled shortbread. This newfound hobby is doing NOTHING for my diet and fitness plans, but none the less it keeps me busy and entertained in the evenings.

I've been slowly building up my utensils and cooking resources every week at ASDA, so when I saw this book in Paperchase organisational inspiration struck again and I just had to have it!


The book is wipeable (good for this slap dash cook!) and has an adorable design on the front, it stays closed with a mint green ribbon (that was the dealbreaker in the store I'm ashamed to say)

This book is a neat freaks heaven, I mean from the organised dinner party planner pages to specific meal times and recipe types, its amazing and at times creepily organised! I'm planning on using this book to stick in all of my loved recipes, usually if I see a recipe I like the sound of I'll email it to myself and set up my iPad in the kitchen, however following a recent incident with my iPad and it's recent scare with a water basin I think this is a safer, cheaper alternative!

So that's all from me today folks, I just wanted to share this cute wee book with you because I got awfully awfully excited about it and honestly sharing with you is just second nature now!

Have any of you started experimenting with cooking / baking recently? Drop me comment below telling me your fave thing to bake, or come chat to me about it on Twitter or if you want to see more posts, come follow me on Bloglovin

Until next time folks.
H.Elizabeth x

Wednesday, 1 October 2014

October Wishlist | Autumnal Wants

It has been a wee while since I've done a post like this, but I suppose it's because I've had far more interesting things to blog about as of late. But alas we are back, and here are my top picks, wants, wishes and lust after list items for this Autumnal month.


#1 A statement coat
I've been seeing a lot of reds, corals and forest greens for Autumn this year and I have recently endeavoured to get away from dull dark clothing colours and add a pop of colour to my Autumn/Winter wardrobe and what better way to do that than with a siren red jacket?!

#2 A new hair do (No pic  since I don't know what I want)
As much as I do love my strawberry blonde Summer locks, they appear out of place and quite lack lustre in the Autmnal weather we've been having (any excuse for a good hair change) so I've been dreaming of an Auburny / Red to see my head through the cold Winter months. Stay tuned for my eventual big reveal!

#3 Maleficent on DVD and in my life!
This film, I need in my life. I saw it in the cinema 3 times and with the date of October 20th being the release date and pending I'm getting myself awfully hyped up! Anyone else?

#4 Heated Rollers
And my quest for voluminous locks continues. Yes I'm still loving a good bouffant hair do and with my velcro rollers working wonders for special occassions and evenings out, I can only imagine what I may achieve with heated rollers.

#5 A pair of good (bonus for sensible) shoes
Walking to work everyday is so good, I get woken up on the way to work, get some good exercise going but the only things that aren't thanking me are my feet! Sometimes I just don't want to have to change shoes arriving at work so I just need a good pair of sensible yet not scary shoes to walk daily in, is that really too much to ask!?

So there you have it, my Autumnal wishlist, if there is anything on here you can potentially help me out with finding for example my lusty statement coat to see me through Winter storms and rain, drop me a comment below, Tweet it at me on Twitter or if you'd just like to keep up and see more of me come find me on Bloglovin.

Until next time, see you folks!

H.Elizabeth x

Sunday, 28 September 2014

Aberdeen Student Lock In | Autumn Haul

Technically no, I am not a student anymore. Well at least as of the very end of September, and I mean I'd quite happily be exploiting my discount up until 11.59pm on the 31st of September that's how much I'll miss my discount. So you can imagine that when Aberdeen's Bon Accord and St Nicholas Shopping centre announced their annual student lock in I was first in line! (not literally unfortunately!)

Pre Lock In
Well the queue was massive, we actually arrived 40 minutes prior to doors even opening and we were I would say reasonably near the front, considering how far back the queue eventually went I was chuffed! 


During the Lock In
As cheapy as it may sound I had been expecting more freebies, I literally went away with one shower gel by L'Occitane and a catalogue from Warehouse which I could have got any time.  I don't feel like the actual discounts on offer deserved as much hype as there had been because there was literally an extra 10% and Boots didn't even bother with discounts, to the dismay of many shoppers we saw loading baskets with products!

New Look (20% Discount)
Tartan Pinafore
I've been dying to get a bit more fashion focused at work since all I seem to be wearing as of late are my black trousers paired with a flowy shirt, and this was RIGHT up my street not to mention on trend for the Autumnal months.

Burgundy 50's Flare Skirt
Something I've been dying to try out and not to mention suit over the past few months is a long skirt that isn't body con, and I do believe I've found it. It's a show stopper!

Parisian Tee
Admittedly I was drawn in due to Paris, our holiday booking is looming and I feel like I'm already behind in buying my holiday clothes! Plus it looks amazing with my 50's skirt.

Purple Floral Geisha Kimono 
When it comes to Kimonos, what can I say? I'm a woman obsessed I think at the moment I have 5 or 6, and this one well I had to have it! I wear these instead of blazers or jackets on an evening out so really you can never have too many!

Coral Stilettos 
Recently I have been dying to buy a pair of statement shoes for special occasions and evenings out, but I had no luck since my tiny size 3 feet only get the boring shoes! But at the lock in I spotted a rare find in the form of stilettos for a tenner! Now if only I had a party coming up!


Topshop (20% Discount)

Lippys! (Macaroon, Ditsy, Wicked and Trigger)
I'd heard good things about Topshop's lippy over the past few months, from their staying power to their moisturing qualities and even their great pigmentation, so when I saw they were on offer at 2 for £12 in addition to discount I jumped to buy 4! (Review pending)

Lip Liner (Burgundy)
Another one of my new obsessives is lip lining, I've seen the MAC girls in town lining to perfection and well I'm a sucker for trends!

Post Lock In
As a general guesstimate I Buyers remorse? Never! I am of course feeling so gutted that this year was my last ever lock in but I look forward to my senior citizens discount when the time comes!

Have you guys visited a student lock in wherever you are? If you have what was your experience of it, a lot of freebies? better discounts? Drop me a comment below, Tweet at me or come follow my latest posts on Bloglovin

H.Elizabeth x

Wednesday, 17 September 2014

Lashes? Au Natural, Strips Or Go Indy

Over the last few months I have been experimenting with a few new looks and products to extend, improve and basically falsify the look of my lashes (it's both a passion and a beloved past time) and I thought  it would be fun to share my recent efforts with you guys and the blogosphere. So if like me you are facing the age old dilemma of daring to bare, over the counter full on falsies or perhaps going under the therapists tweezers and going for full on lash extensions this review might be just what you're looking for!

 Daring to bare
Clinique High Impact Mascara RRP£17.50
As you'll all know by now I am a great lover and avid hunter of mascara. If there has been a latest and greatest fad, I've been at the front of the queue, from L'Oreal's Miss Manga, the cat eye mascara that swept us beauty bloggers a few years ago (which in my opinion smelt terribly like cat pee!) right down to Benefit's 'They're Real' mascara (which I continue to be a great lover of) but no matter. If you do dare to bare your lashes, in my opinion there are only two ways to go. My much beloved Benefit mascara has gotten me through many a dark stubby lash days or my other love, Cliniques High Impact Mascara in black (can be seen in the photograph below) With the appropriate technique (wiggle wiggle wiggle) and a steady hand you can actually achieve falsie heights and volume with either of these two wonder products.
                                                                                           
   Strip Falsies   


Eylure KP Lashes (Sweetie Pie) RRP £5.95
Ah falsies from my youth, when the hair was super backcombed and my eyelashes almost met my hairline! I don't think these will ever grow old. Given that they are simple enough to put on and don't look too full or thick you could easily pass these off as your natural eyelashes. Steady hands and a but of know how is your best friend here ladies, make sure you apply the glue to your strip first give it a wee wave then apply glue to the other, this should give eyelash one a chance to develop a tackiness that will allow easy application. I have never really strayed from my Eyelure lashes so maybe I'm not the most objective but these honestly do wonders and if you look after these properly and remove any tack or glue after each use you could use these for up to one month (with about  3 or 4 days use a week) For temporary lashes these are on the pricey side but when it comes to something near your eye, you don't exactly want to scrimp out.

 Individual Lash Extensions
Baker Street Salon Aberdeen £30.00
Last but not least, the contemplation of lash extensions. The allure of long, lush lashes on a more semi permanent basis I admit got the better of me a couple of months ago when I visited a local salon to have them applied. An uncomfortable procedure involving a large cotton pad under your eyelid, tweezers and a painstaking amount of time. Of course I fell in love as soon as I saw them, more natural looking than my beloved falsies yet longer and better than my really real lashes. The downside? The incredibly intense upkeep and maintenence is impractical for a busy city girl like me, also for someone who likes to give their face a good scrub, or likes to merely touch their face, or sleep comfortably. These may not be the best route to go down, but if you live in a plastic bubble and literally sit around all day then these are right up your street.

 Verdict    


If you're going for a more nautural day look I would of course opt for the mascara, it's light, won't weigh down your lashes and you won't blow people away with a blink.

On the other hand if you're going for a full, glam evening look or you just want to look super dressed up then falsies are your friend.


As for the individual lashes I would not recommend these at all unless you are prepared for something super high maintenance on your face (I'm talking washing your face will be your new nightmare!)
Hopefully this has helped some of you lovely beauty enthusiasts make an informed choice today, if you have any lash loves in terms of mascara, falsies or maybe you've had a fabulous experience with individual lashes drop me a comment below, tweet at me on the Twittersphere or if you'd like to keep up to date and see more of the Granite City Girl be sure to follow me on Bloglovin


H x


Sunday, 14 September 2014

GCityGirl Catch Up

Hello lovelies, and thank you for being oh so patient with me while I have been off gallivanting and having all sorts of milestones, events and well just adventures really (also my laptop broke) Apologies, but rests assured I am well and truly back and you have my (almost) undivided attention!
So today's post is going to be a shameless justification of why I have abandoned my blogging duties and neglected to share with you my lovely life updates. 

Here goes nothing:

1) All of my hard work finally paid off and I graduated in Communication and PR with a 2:1 Honours Degree. Woop!

2) My lovely friends treated me to a very suave and sophisticated hen weekend in Edinburgh

3) Shortly after my nearest and dearest took a 13 hour train journey to celebrate my marrying the love of my life in the most perfect Cornish wedding there ever was, has or will be! 

4) I swapped careers a couple of times, but have finally settled into a job I am super happy in and actually get to use my degree


 (More exclusive than the Jolie - Pitt wedding)

All in all ladies and gents a whirlwind few months for me, I hope all of you guys are keeping well and if you've celebrated any big days, milestones or had a fantastic moment in life recently I'd love to hear about it. Drop me a comment below, be sure to catch me on the Twittersphere or if you want to see more keep up with me on Bloglovin

But for now I leave you with a wee collage of the past few months (above), hope you enjoy.
H x


Wednesday, 4 June 2014

New Additions | Feeling Comical

A few weeks ago I went on a bit of a spending binge, I'm afraid it progressively got worse the further along I my dissertation was coming, probably as a result of filling the void where my social life used to exist... but I'm pleased to report that it is indeed working its magic. So I thought it was high time to post something, since hibernation/dissertation mode has also robbed me of my blogging time and since this binge is literally all I have to share right now, here are my latest and greatest wardrobe buys!

Comic Print Midi Skirt - Miss Rebel
You know I just had to! Having just visited the London Super Comic Con 2014 back in February when I bought this I was in super geek comic pop arty mode. I have since worn this once it's a lovely fit for girls with a fuller figure with lots of curves like myself, however there is a rather unfortunate word placement on the skirt with the word 'crack' being right across your booty.... comical indeed!


Star Wars Baggy T - H & M
My new best ever favourite sleepy loungy comfy top ever. This top is never off my back it's quite a long fit so on hot nights I'll wear it as a nighty and it can always be paired with my loverly furry sleepy boots. As you can see I have been a very indoorsy person as of late....I blame sheer exhaustion from university but I promise as Summer rears its head things will get better!


Space Shorts - Topshop
Oldies, goodies and I wish I could still fitsies!!! These faded space patterned shorts got me through Summer 2012 / 2013 in style, before the pre graduate pounds crept onto my waist!


Spacey, Geekery Jewellery
As you can see from the pics above I love accessorizing my geekery clothing with equally geeky jewellery like my star trek emblem earrings which I acquired from London Super Comic Con 2014. If you'd like to know where I got the specifics leave me a comment below!

Well those are my latest and greatest comical geeky best buys, if you guys have been loving any and all things 'geek' lately drop me a comment I would love to check those out. As always you can find me on Twitter or if you'd like to keep up to date with the latest Granite City Girl posts catch them all on Bloglovin!

H.Elizabeth xx

Tuesday, 20 May 2014

What I Wore | Fairytale Fashion

Yaaay it's that time of year again (well that one day a year we get here in good ol' Aberdeen) where the sun has got his hat on and makes our great city glitter, Summer! And what better way to celebrate than to dig out the wardrobes summer finest, and in turn celebrate the up coming release of Disney's Maleficent at the end of May.

What I Wore on my Body

Vest - 'Who is the fairest of them all' Metallic Fairytale Vest, H & M (incredibly comfy!)
Jeans -
High Wasted Light Wash Jeans, Topshop
Feet- Plain black pumps, New Look

What I Wore on my Head and Face 

Hair - Iron Curled Ends (using straighteners) otherwise straight all over.
Face - Nivea Moisturizer
Collection Lasting Perfection (Fair)
Eyes - L'Oreal Colour Riche Crayon Le Khol (Midnight Black)
I used a trio of colour from my Urban Decay Naked 2 Palette
Lips - Burts Bees Lip Balm

Given the weather has been so good my skin has been behaving incredibly well (I put it down to the rays we Aberdonians have been catching lately!) and all I have been using on a daily basis is my regular moisturizer and a touch of concealer to get rid of any redness or blemishes, fingers crossed this continues throughout the coming months!

So that is my homage to fairytales and princesses of Summer, it may be a tad dull but I'm afraid this is often as bright as we get here in Aberdeen. I have been working on a few new hairstyles inspired by the vintage ladies of the 1950's and 60's in addition to a few You Tubers I have been loving lately (Cherrydoll Face to name one, go check her out!) so if you enjoy trying something a little vintage and something a bit different stay tuned for my take on these timeless classics.

As always you can catch me on Twitter or if you'd like to keep up to date with the latest with Granite City Girl follow me on Bloglovin, catch you on the next one.

H. Elizabeth xx

Blogger template by pipdig