Showing posts with label False Eyelashes. Show all posts

Wednesday, 19 October 2016

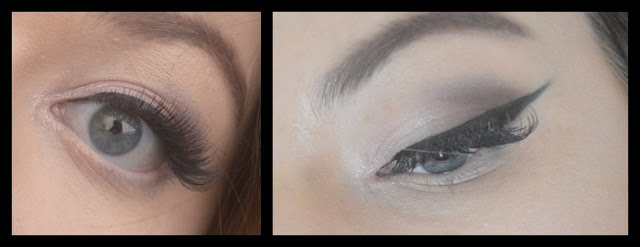
Copper Smokes | Autumn Eye Make up Tutorial

Autumn Copper Make up geek

Some like copper in their homes, some like copper accessories, phone cases, key rings, jewellery etc. Me? I like copper where you can see it, right on my eyeballs (or thereabouts) So today I'm bringing you my first ever make up tutorial featuring some of my favourites by Bobbi Brown, Make Up Geek and one of my fave tubers Manny MUA (and of course...lashes, lots and lots of lashes!)

Make up geek

1. Make up Geek X Manny MUA Cosmopolitan & Frappe
Use Cosmopolitan to define your crease using a fluffy brush in light sweeping motions to build up the colur - this will be your transition shade.
Darken up your crease with the shade Frappe using the same fluffy crease brush.

2. Make up Geek X Manny MUA Mars & Aphrodite
Using a smaller domed brush sweep Mars along the crease and lightly in the outer corner of your eye, blending with your larger fluffy brush when required.
Using that same brush go over your outer corner and crease with a touch of Aphrodite and blend as required again.

3. MAC Fix+ & Make up Geek X Manny MUA Luna  & Artemis
Spritz a flat shader brush with MAC's Fix+ (not a necessary step but helps the pigment come through more vibrantly) and pack on the shade Luna from the middle of your eye to your inner corner.
Blend together your outer corner and your mid shades with a small, dry shader brush.
Highlight your inner most (demons) corner with a light dusting of Artemis.

4. Make up Geek X Manny MUA Mars & Aphrodite
Using a pencil brush pick up a light dusting of Mars and Aphrodite then drag ad blend this underneath your eye - just under the waterline. You can take this as far along as you like, I personally always go halfway along as I feel it opens my eye up that much more.

5. Bobbi Brown Longwear Gel Liner in Black Ink & Mascara
Use a damp winged liner brush to line the top of your eyelid and create a 'cat eye flick' then use your favourite mascara (I use both Arbonne Mascara and Benefit's Roller lash) to make your lashes blacker than black.

You can then finish off your look by applying a set of your favourite false lashes, here I have used Eylure Definition Lashes in style 121.

Now you're all set to conquer those dark autumnal nights, sparkling, shining and wearing copper in a brand new way (also you may even now be able to match those oh so chic homewares and accessories we spoke about earlier!)

Hopefully you have enjoyed my first ever eye make up tutorial, I post looks like this all the time over on my Twitter and Instagram so do comment below or even on the socials if you'd like me to do another. Otherwise I thank you for taking the time to paroose this particular post and I look forward to catching you on the next one.

Until next time folks, colour me copper!

H.Elizabeth x


Wednesday, 17 August 2016

False Lash 101 | Cleaning your False Eyelashes


Since my first every post on my false lash obsession I've had a lot of questions, ranging from how do you put them on every day, where do you buy them, which brand has the best lash and perhaps my most asked question, 'can you reuse them and if so how do you clean them?' To which I usually quippily reply, 'you think I buy new lashes eryday, honey how much money do you think I have?' what a dedicated soul (large bank balance) you must think I have! So today I thought I would dedicate an entire post to how I do just that. Cleaning and caring for your false lashes. 

Given the proper cleansing routine and of course a steady and delicate hand your lashes should last you approximately 3 weeks (not of course accounting for nights out or big events which can make lashes decidedly gross and fit for the bin)  But before I get in to how to clean your lashes and store them properly I just want to mention a couple of things that have the potential to ruin your lashes before cleaning even begins. Removal. Removal of your lashes is key to keeping your false lashes AND your natural lashes in tip top condition, pulling, yanking, ripping or of course sleeping with them on even is a sure fire way to pretty much burn your money and wreck all of your lashes. So, no matter how tired (drunk) you are, how (much of a wimp) scared you are you must remove them before bed (and you know wash, cleanse, moisturise all that jazz) 

1) Carefully peel your lashes off , if they stick use an oil based make up remover and a cotton bud working from the outside inwards.

2) Using small tweezers pick any noticeable glue from the lash band and then bend them back into a 'natural eye shape'

3) If your lashes are looking a bit grotty (bleh!!) then spritz them with an alcohol solution and keep them in a clean dry place.

4) Store your lashes back in the tray they came in alongside the glue (bit of a practical move there!) and they'll be all ready and waiting for you next time!

Another tip would be to avoid using any mascara on your lashes, I realise people say they 'bind' the lashes and make them look more natural but when applied properly and right at the edge of the lash line I haven't noticed very much of a difference. Otherwise there isn't very much to it, you know treat them like your furry babies and make sure they're tucked in safe at night and that's about it! Hopefully this has cleared up any questions you may have had about your totally natural lashes (wink wink) but any questions for me be sure to leave them in the comments section below, come have a chin wag with me on Twitter, visit my Insta or keep up with my latests on Bloglovin.


                                                    Until next time folks, don't be a wimp!

                                                                          H.Elizabeth x


Wednesday, 10 August 2016

A whole other dimension | Eylure 3D Lashes No 119


3D lashes, have you ever heard of anything more marvelous in your entire life? Well maybe a 4D experience lash which will single handedly create their own wind (how can I grow if you won't let me blow comes to mind here) but perhaps that's a technological leap for another day. Today as you perhaps could have guessed I'm going to be talking about a brand new type of lash that has hit the stands with Eylure recently with a layered '3D' lash that promises to offer the wearer length and volume. I have been using these in number 119 for a month or two now and these, alongside my favourite textured lashes, are my new daily go to. Sorry it has taken quite so long for me to review these given I have been using them for quite a long time, but I did want to see how long one set lasted as well as give an overall in depth review, so without further ado let's do this (3D Glasses at the ready..)

3D Lashes
The first thing I noticed about the lashes of course was the double band, having been used to wearing a lash that has one very thin and flimsy band I was worried these new, improved, double, super wham bam lashes would be too heavy on the eye  or perhaps that the band would be overly obvious and make me look (more) fake, but that hasn't been the case. In fact since wearing them I've had more people ask 'what my secret is' to long and healthy lashes which of course I still myself do not know, but hell if I had wanted to tell folks I did an egg eye wash or caked them in Vaseline every night I'm sure I'd have duped many. Where yes in reality these lashes give me a more doll like appearance than my natural piggy eyed state as they fan to the sides slightly and really 'open up' the eye - which is fab for someone with a hooded eye like myself.

Another thing I've been pleasantly surprised by is just how much more comfortable I've been finding them. As opposed to a singular band which can come loose at the sides relatively easily and give that all too familiar stabbing sensation we lash wearers have all come to know and loathe, these feel more secure and last all day (yes gals even though hayfever season - or you know ugly crying at the season finale of Friends)

In their collection I belieive at the moment Eylure only offer another one set of 3D lashes the 111's which I have also tried but don't give as 'natural' a look as the 119's. At the moment I have about 3 sets of these ready and rearing to go (shout out to Superdrug and their 3 for 2's) but these last around 3 / 4 weeks if you clean them properly and of course remove them carefully!

Just as a quickie reminder, if you need a quick crash course on false lash application I have a 3 step super simple false lashes in a flash tutorial that you can read through right HERE.

Which lashes do you love or loathe? I'd personally love to hear your suggestions, comments and favourites in the box below, come share your best brands with me on Twitter, or of course keep up with my other channels, Instagram, Facebook, Bloglovin etc, etc.

Until next time folks, 3D glasses at the ready!

H.Elizabeth x

Friday, 22 July 2016

Building my Pro MUA Kit | FalseEyelashes.co.uk Haul

False eyelashes may be my biggest expenditure to date. Forget the MAC foundations and the Bobbi Brow liners, forget the Kylie lip kits and Too Faced eyeshadow, the real and greatest expense of being a make up artist comes from your disposables (so cotton pads, cotton buds, micellar water and baby wipes) But what's my biggest disposable? Lashes. Lashings and lashings of lashes. You see the thing with lashes is, once they're gone, they're gone. They aren't reusable, you can't cut a lash in half and use the other half for someone else (gross) so if you have 4 ladies needing a face, that is 4 pairs of lashes, roughly costing £20 - £25 if you use Eylure from Superdrug / Boots as I have. Naturally this couldn't continue if I wanted to continue pursing my Make Up Artistry career and I decided to go on the hunt for a cheaper similar quality alternative. 


That is when I discovered falseeyelashes.co.uk who not only stock my tried and tested Eylue lashes at a lower cost, but American / Canadian brands I was otherwise unable to get my hands on in Scotland. Ardell, Red Cherry, Peaches and Cream, Eyecandy and even Mink lashes (not sure how I feel about these) And not only is the website cost effective but the delivery was super quick too, I for example, placed an order on the Saturday night and received my lashes by Tuesday. With that in mind today I thought I would share some of the lashes I picked up in my first ever pro false lash haul.

Ardell Demi Wispies Multipack (4 pairs for £11.99)
If you're a beauty blogger or watch a lot of beauty you tubers then you'll have seen these lashes kicking about pretty much every where. The Demi Wispies are Ardells most popular lash and it's not hard to see why. They're textured, they're lengthening and they'll really help open up your eye as they fan out towards the sides which I love! As you can see I picked up two of these as I can see these being a very popular choice with the girls who visit me in Blush.

Ardell 105 Glamour Multipack (4 pairs for £11.99)
For the bold and fearless ladies looking for a bit more glamour in their lives! These lashes are super long, super full, super voluminous and will be really lovely for those ladies who are heading for a night on the town. 

Eylure Lash Edit - Paris Set (3 pairs for £6.95)
Okay admittedly these are sort of for me, but of course if someone spies them in my kit and wants to give them a good go, then I will not stop them (I may cry but we'll carry on!) These ones are a bit cheaper than the New York set (RRP £9.95) but I don't know why. You get good day lash, a good voluminous evening lash and of course something for those in between moments. These would be classes as lengthening and voluminous as opposed to textured, great for when you've got minimal eye make up but still want to make a statement.

Red Cherry Lashes (Complimentary gift)
With my order came these Red Cherry Lashes which the company must be trying to shift, but hey I'm not complaining I got free lashes! I have never tried Red Cherry personally but I have seen a lot of beauty based You Tubers who have used them in tutorials so I'm looking forward to giving these a go regardless.

Hopefully ordering this way and trying, experimenting and using new styles means I will find something a bit more appropriate for my kit and of course something that the ladies in my chair will love! As for you lovely lot I hope you have enjoyed this post, leave a comment below telling me what you favourite style of lashes are or your favourite brand and I'll be sure to check those out during my next haul. As per I'm on the usual socials, Twitter, Facebook, Instagram and more from the blog on Bloglovin!

Until next time folks, lashes so long!!!

H.Elizabeth x

Blogger template by pipdig